
The Garden is incredibly fortunate to be able to partner with Fay Gold Gallery to bring a selection of fine art prints to the Garden during the Moore in America exhibition. All the works may be purchased either through
Fay Gold Gallery or the Garden Gift Shop.
David Mitchinson, Head of Collections and Exhibitions, The Henry Moore Foundation, prepared the following, fascinating essay about the graphics exhibition. Enjoy!
This selection of graphics, spanning nearly twenty years of work, is testament to Moore’s continuing fascination with the aesthetic possibilities inherent in printmaking. At the Henry Moore Foundation in Perry Green are more than 6,000 prints, including most of Moore’s working proofs, which are the states and proofs produced prior to the printing of editions made for sale. Moore was an extremely prolific printmaker with over seven hundred published editions, all of which are illustrated in a four-volume catalogue raisonné dedicated solely to his graphic work. These tomes, compiled by Gérald and Patrick Cramer, Alistair Grant and David Mitchinson, are the source of the CGM archive reference for each work, and record the printers, publishers and others who collaborated with the artist in this tremendous outpouring of creativity.

Moore made his first graphics in 1931 and continued to produce them spasmodically until the mid-1960s when their numbers increased. This escalation was partly to meet demand but also because Moore found printmaking physically less demanding than working in three dimensions. Here in Atlanta are examples of etchings and lithographs, Moore’s two favourite printmaking techniques, with individual examples coming from some of his most well known and popular portfolios.
Moore’s lithographic output incorporated a variety of techniques, but all were based on the old principle that wax and water don’t mix. Lithography, a planographic (flat-surface) printing technique had been invented in 1798 by the German dramatist, Aloys Senefelder. Simple in principle – depending for its effectiveness on wax and water not mixing – it was popular throughout the nineteenth century both commercially and as a medium for artists’ prints. After drawing the image with a greasy crayon on to a smooth surfaced, water absorbent limestone block (or from 1830 on to a granulated zinc plate) and fixing it with a solution of nitric acid and gum arabic, the stone was dampened before being inked. The greasy area repelled the water so that the ink adhered only to the drawing, not to the rest of the surface. Paper was placed on top and under pressure the ink transferred to it from the stone. This produced an image in reverse, a condition easily rectified by offsetting it on to a roller before printing. In 1837 the French artist Godefroy Englemann introduced colour lithography, a process later referred to as chromolithography. Each colour needed a separate printing and relied on precise registration to produce a perfect result.

The use of light-sensitised plates, usually made of aluminium, prepared by the manufacturer with an anodised layer and in turn covered with a diazo (light-sensitive) layer, was developed in the 1960s. In this version of lithography the image was transferred by ultraviolet radiation, which was ‘fixed’ in a very durable form, giving the plate a considerably long life. No form of photography was needed. This process, known as continuous line lithography, or sometimes diazo-lithography, was used for many of Moore’s lithographs. The technique involved the artist drawing on to a sheet of commercially manufactured grained tracing film. This had several advantages over conventional lithographic transfer paper, plates of lithographic stones. It was dimensionally stable; it enabled the artist to use any opaque drawing medium, whereas previously only greasy materials could be used; and because the paper was transparent, accurate registration for the different colour separations was greatly simplified. The drawings were made in black, and experimentation with colour took place at the proofing stage.
Etching is an engraving or intaglio process in which the image is scratched into an acid-resistant ground covering a metal, usually copper, plate. When submerged in an acid bath the acid bites only into the exposed area of the plate. To print, the ground is removed with solvents; the plate is polished and inked then wiped clean, leaving ink in the acid-bitten grooves. Damp paper is placed over the plate, and under pressure from the printing press the ink lifts off on to the paper’s surface. Aquatint is used where the artist needs tone or colour in addition to line in an etching. It is made from a very fine resin or bitumen dust sprinkled evenly on to the surface of the plate. Under heat this adheres to the metal in minute dots, creating a fine texture that can be worked with etching and modified with tools such as a roulette (a small hinged wheel with sharp teeth) to refine, gradate or remove the surface. Aquatint printing represents a complex and painstaking process calling for much skill and judgement on the part of the printer.

In Moore’s graphics subject matter tended to be figurative and often bore a relationship to works in sculpture. In this selection female and reclining forms, as well as mother and child, figure prominently. One area of puzzlement is in the size of editions and how they were numbered. Moore liked to keep the total number of copies small, with fifty, numbered 1/50 to 50/50, being his standard edition size. In addition, a few proofs identical in every way to the edition were kept by Moore for him rather than the publisher to sell; these were also numbered, usually in Roman numerals I/X to X/X. As a few extra copies were often needed as gifts for printers, publishers, museums and archives, the number of copies actually printed increased to seventy or seventy-five.


 There is a door in the back side of the midsection that allows access for Henry Moore Foundation conservator Laura Robinson to climb inside. James Copper, her colleague, guides the tail end of the sculpture toward her so she can fasten it to the midsection.
 Laura is inside there somewhere...ready to attach the two pieces. The fourth portion of the sculpture (not pictured) is a small curve along the back.
 The joints are covered over with Bondo, ground smooth, then painted by Laura, now freed from the interior. (Photos taken April 20-22.)
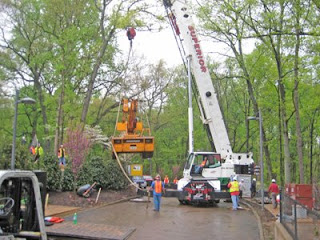 We were very fortunate to have begun the planning for this exhibition prior to construction beginning on the expansion project. The timing enabled us to make special requests to
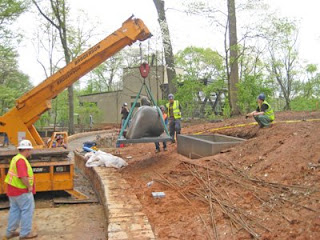
 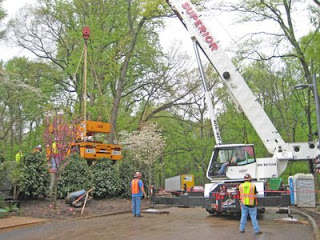 The tricky part was getting to our swanky new sidewalks. Since the old part of the Garden has only pedestrian grade walkways, we could not drive the equipment through to the new part. Instead, we used a large crane to pick up a smaller one and set it into the woodlands. Then we used the large crane to pick up the sculptures, sometimes in pieces, and set them next to the smaller crane. Then sculpture could then be transferred to the small crane for placement in the Southern Seasons Garden.
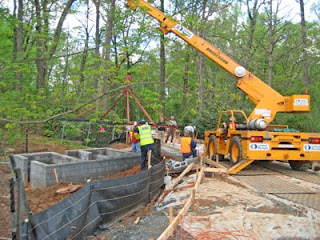
 And in this image, you can barely see how the sidewalk ends right before the crane. The construction schedule was delayed due to rain, so the walkways were going in at the same time the cranes were operating. Obviously cranes and fresh concrete don't mix particularly well, so they poured right up to the point the crane would sit. Everything beyond that is "boarded out" with rubber and plywood boards to keep the crane from sinking in the mud. It took at least three full pallets (read: dozens) of boards to create makeshift sidewalks so the artwork could be installed. (Images taken April 14, 2009)


 Ah yes...the ol' "up and over" maneuver! Works every time!
 A slightly larger "up and over".


